A PPM Masterclass – Part 2: Specifying the Work to be Done
If you followed Part 1 of this post then you should have a pretty good idea what PPM Schedules are, how they work and how equipment can be linked to them. The most important point to recall from Part 1 is the PPM post-processing, which occurs every time a PPM job is closed. This is so important that I’ll repeat it. This is what happens every time a PPM job is saved:
1. If there is a value in the PPM Schedule field on the Work Done tab, and this device is not already linked to the specified schedule, then the asset will be linked to the schedule.
2. If the job status class is “Completed” then the Last PPM Date field on the equipment record will be updated with the current date and time.
2a. The frequency is read from the schedule along with the anchored/floating indicator. This is used to calculate the next due date for this asset on this schedule. If this date is before the current value of the Next PPM Date field in the equipment record, then the equipment record Next PPM Date field will be updated.
2b. If an unfinished job does not already exist for this schedule and asset, and if the specified PPM Schedule is not marked “Do not Schedule Jobs Automatically”, then a new scheduled job will be created for this asset/schedule.
Remember that it doesn’t matter how the job is saved: you can bulk update, edit in the grid, click Save & Close on the job property page etc.
This article will concentrate on how the next PPM job is scheduled for the asset, and in particular, where the work instructions come from.
Specifying the Work Instructions
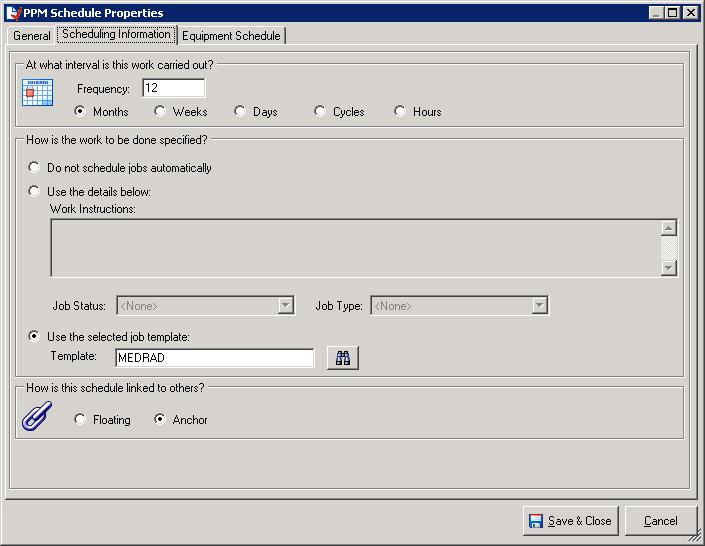
The PPM Schedule tells the system how to generate (or schedule) the next PPM job during phase 2b above. The frequency and anchored.floating flag are used to work out the next PPM date, but there are 3 ways in which the new job can be generated:
1. The first option tells the system not to generate the next PPm job at all. This is most often used for contract PPM jobs where the jobs for the PPM visits should be scheduled from the Contract screen when the contract is first set up or renewed.
2. The second option is intended for very simple jobs where the only things which need to be specified are the job type, job status and the work instructions.
3. The 3rd option is the most advanced and allows a job to be specified in great detail, including spare parts, tests etc. Using this method you first create a job which describes the PPM work instructions. However, instead of clicking “Save & Close” on the job property page, click on “Save as Template”.
Conceptually, job templates are very similar to Word templates in Microsoft Office: in Word you can define a standard letter leave the name and address to be populated from the database. A job template lets you define a standard job, and the equipment details are filled in from the database.
When creating templates for PPM schedules, be sure to save them as shared so that other users can access them.
Linked Documents
If you are going to rely on either job templates or work instructions within PPM Schedules, then you will need a lot of PPM Schedules. If you maintain 1000 different models of equipment then you will need 1000 (at least) schedules, since the work instructions will be different for each of them. This is clearly a considerable management task.
There is a better solution – linked documents. The E-Quip document library allows an electronic document to be linked to any item in the database. In Part 1 we considered 2 different maintenance schedules for a car:
Every 500 Miles: Check engine oil, check engine coolant, check type pressures, check windscreen washer fluid, check brake fluid level, check lights, …
Every 20,000 Miles: Change the engine oil, change air filter, lubricate suspension, check wiper blades, re-gas air-conditioning, change pollen filter, …
Suppose that the work instructions for the 500 mile service were stored in the document “car_500_miles.pdf”, and those for the 20,000 mile service in “car_20000_miles.pdf”. The way that document inheritance works in E-Quip means that if a document is linked to a model then it is not only visible from the model screen but also from every other screen which has a model field. For example, if you link a document called “MS26 Maintenance procedure.pdf” to the MS26 model, then that document will be visible from the asset screen (for every asset which is an MS26), and also from the job screen (for every job on an asset which is an MS26). We can make use of this when defining PPM work instructions. All you need to do is to link the documents “car_500_miles.pdf” and “car_20000_miles.pdf” to each model to which those service instructions can apply.
Now, if you use PPM Schedules with the 2nd option for specifying work instructions you can enter work instructions along the lines of “PPM to be carried out in accordance with attached documentation”. When a PPM job is created for an MS26 the work instructions will be “PPM to be carried out in accordance with attached documentation” and the attached documentation will include “MS26 Maintenance procedure.pdf”. When a PPM job is generated for a Morris Oxford the work instructions will again be “PPM to be carried out in accordance with attached documentation” but the attached documentation will include “car_500_miles.pdf” and “car_20000_miles.pdf”.
Note that in this example these work instructions are more generic than model-specific. The instructions “change engine oil, change air filter, …” apply to any car; there is nothing in them which is specific to a particular model of car. In practice, work instructions for medical devices are more likely to be model-specific.
The use of linked documents for work instructions should allow you to minimise the number of PPM Schedules that you need to create.
In the next article I’ll cover how to do PPM scheduling for equipment on maintenance contracts.


