A PPM Masterclass – Part 3: PPM Scheduling for Devices Covered by Maintenance Contracts
Why should your strategy for planned maintenance be any different than for devices that you maintain in-house? If you are familiar with E-Quip AM PPM scheduling (there are several posts on this blog about this) then you will know that as you complete a scheduled PPM job the next job is automatically scheduled. Surely this is equally applicable for in-house and contract-based maintenance?
Well, although you can do this there are a few differences that it pays to take into consideration. The first is that if you rely on the standard auto-schedling features of E-Quip, then any jobs scheduled for the future will be associated with the current contract. That’s fine if the job is the first visit of a multi-visit contract: the future jobs should be associated with the current contract. But if the job relates to a single visit contract, or is for the last visit of a multi-visit contract, then the contract assigned to the next job will be incorrect and would need to be manually adjusted.
Another complication arises when it is time to consider whether or not the contract should be renewed. Before you renew a contract it would be good governance to check to see if the contractor actually met the terms of the contract this year. To do this, the simplest thing to do is to find all jobs that were planned under the contract and check that they have been completed. A very simple filter will identify all jobs carried out under the contract, but you if you have used auto-scheduling this list will also include jobs scheduled for next year. You must remember then to exclude any future jobs from your evaluation, which is one more step to remember, albeit a very small one.
So, you review the list of planned jobs, and if you are very lucky, every one of them will have been completed satisfactorily. It is far more likely that some of them will have been missed: possibly the devices could not be found, or were in use by patients, or maybe the contractor did not make the required number of visits. You must then decide what to do about the uncompleted jobs. The number may be so small that you decide to accept that there was a good reason for them not being done, or you may call the contractor in again to do the uncompleted jobs. Either way, the outstanding jobs will be closed, which will in turn generate more jobs for next year.
Suppose that you choose not to renew the contract; you now have possibly hundreds of PPM jobs scheduled for next year which must be deleted or cancelled (the latter is preferable). If you do decide to renew the contract you must now:
a) Renew the contract
b) Update all the jobs that were created by auto-scheduling for the old contract so that they are associated to the new contract.
c) Adjust the planned dates for those jobs to reflect the visit dates planned for next year.
While this might not seem like a huge amount to remember, the more manual your processes are, the more error-prone they are likely to be. This is why we don’t recommend using auto-scheduling to manage contract visit jobs.
An Easier Way
Rather than linking devices to PPM schedules, to overcome these problems we recommend that you use contract-based scheduling to manage devices which are maintained under 3rd-party contracts. “Contract-based scheduling” means that the jobs for contract visits are created (i.e. scheduled) when the contract is taken out or renewed.
When you set up a contract one of the things you must do is identify the equipment which is covered. There are 2 ways to do this, depending on the number of assets on contract.
a) Adding a Small Number of Devices to a Contract
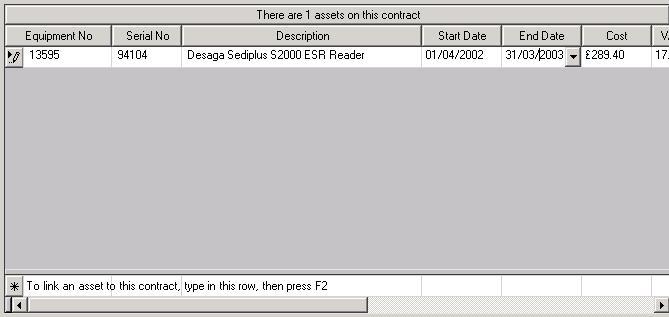
From the contract property page, go to the Equipment Schedule tab (the equipment schedule is the list of devices on the contract). From here devices can be added to and removed from the contract. To add a device, simply add its details in the grid template row then press either Enter or F2, just like editing any other embedded list in E-Quip.
b) Adding a Large Number of Devices to a Contract
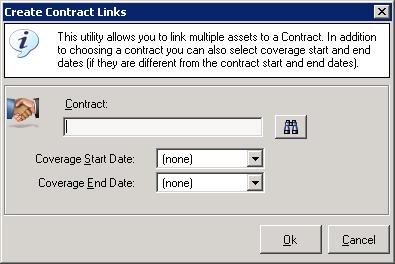
The method described above would be very time-consuming if you needed to add several hundred items to a contract. It is far simple to work instead from the equipment summary screen. From here, first identify the equipment that is to be added to the contract. This will involve setting a filter of some kind, depending on how the devices can be identified. Then, in the grid select the items that you want to put on the contract. Right-click the mouse and choose “Add the Selected Assets to a Contract“. A small screen will appear which will allow you to select the contract and optionally enter the coverage start and end dates. If you omit the dates then the contract start and end dates will be used.
When you click Ok, all of the selected devices will be added to the contract.
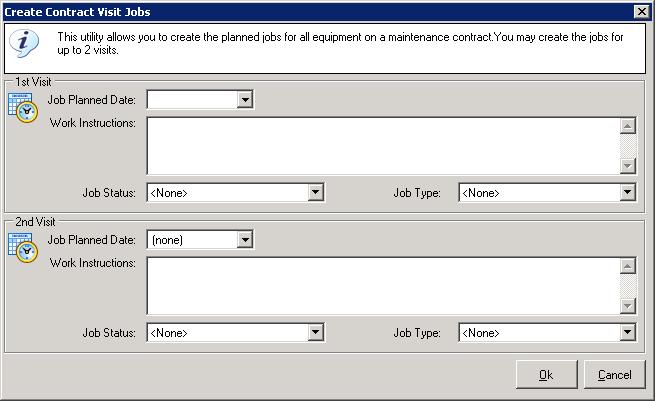
So you’ve set up the contract and linked all the covered equipment to it, how do you schedule the jobs for the visits? Presumably you will have discussed and arranged the visit dates with the contractor. From the contract summary screen, select the contract, then right-click and choose “Create Contract Visit Jobs“.
This screen allows 2 visits to be scheduled; to do more, simply run the urility several times. Enter the dates of the visits and some work instructions, a job status and type, and then click Ok. The system will create a job for each visit for each device covered by the contract.
Renewing/Cancelling the Contract
What happens now at the end of the contract term? As before, you either renew the contract or not. Finding all of the jobs scheduled for this contract is a trivial filter allowing you to assess how many of the jobs have actually been completed. As before you can either close down the uncompleted jobs or call the contractor back in to do them.
If you do not renew the contract then there is nothing else to do, as no future jobs will have been scheduled. If you do renew the contract then simply repeat the visit scheduling process once you have arranged the dates with the contractor.
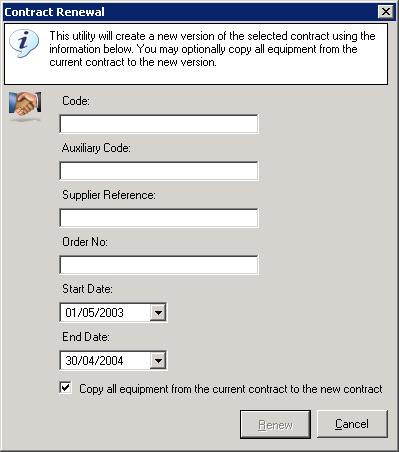
What is the easiest way to renew the contract? Select the contract on the contract summary screen then right-click the mouse and choose “Renew“. This will display the following screen:
Enter the new details for the contract as appropriate. For contracts covering a large number of assets, or where the assets covered by the new contract are broadly similar to the contract being renewed, tick the check-box to copy all devices from the old contract to the new. When you click Renew, a new contract will be created and, if you ticked the box, all assets will assigned to it. Naturally, only active assets are copied from the old to the new contract.
It will often be the case that some of the devices covered by the previous contract will have been decommissioned during the year and will not be covered by the new contract. These should be removed by opening the newly-created contract, selecting the devices to remove, and pressing the Del key.
Now you can schedule your contract visit jobs as previously described.
Of course, there’s nothing to stop you managing contract jobs in the same way that you manage in-house work, we just think that contract-based scheduling will make your life a little bit easier.
